How to create and use segments in ConvertKit
Disclaimer: This post may contain affiliate links to products or services that I recommend. I may receive a commission should you sign up through my link (but at no additional cost to you). I only suggest products and services that I wholeheartedly support and believe in and have either used myself or have used on behalf of a private client.

Are you using segments in your ConvertKit account? If not, you may want to consider setting some up to make it easier to select specific groups of customers and subscribers to email at any one time. Find out how here.
How to create and use segments in ConvertKit
Segmenting your audience is a great way to be strategic about the way you promote your offers and deliver value to your readers.
But often, so I’ve heard, many new (and established) ecommerce store owners wonder how to segment their subscribers list and how best to use it.
To understand the purposes of segmenting you’ll want to read this article, which goes into depth about how you’ll consider segmenting your readers and customers, but if you’re a ConvertKit user you may just need to know the technical side of it and implement what you already know you need to do.
So in this video I’ll be taking you through a few easy steps to segment your readers so that you can get the right message to the right person.
This not only includes creating and using segments within ConvertKit but also how to segment them in the first place.
Watch the video below or scroll to read further.
Phase 1: Creating your tags for segments
Phase 2: Using those tags to create and use segments
Phase 1: Creating your tags for segments
First of all before creating the segment you need to apply the tags that you’ll be using to do the segmentation.
You’ll do this using automated behaviours within ConvertKit itself. Here are a couple of ways you can segment.
1. Ask your audience
Within an email, you can set up link triggers so that when a reader clicks a link a tag is applied. You need to create your tags, have a link to which they’ll be sent to acknowledge their action, and then link those tags to linked text within an email.
You can ask what your audience is most interested in in terms of what they want to be informed of... offers, product updates, subject matter, educational information... All you need to do is create the tags relevant to the categories and then link them to the selections within your email.
See the example below:

2. Tagging based on actions
Similar to above, you can set automation rules to apply tags depending on your readers action.
This can be clicking an article link in an email, signing up for a specific product discount or free report, purchase actions etc.
If using links in emails you’ll follow the step above, but for signing up to forms or products you can use “Rules” found in the Automation section of ConvertKit.
Select the form which a subscriber will join and then choose what tag is applied when this happens.
For example, if someone signs up to receive my landing page copy checklist, then I know they’re interested in learning more about copywriting , so I can tag them with my “Interest: Copy” tag.
See how the rules operate below using triggers and actions. This selection is available through Automations > Rules > Add Rule:

Phase 2: Using those tags to create and use segments
Now that you’ve created all the relevant tags either based on interest or perhaps which “bucket” they fall into (depending on how you segment your audience into who they are or their needs), you can go ahead and create segments within your ConvertKit dashboard.
This will allow you to easily select a specific group of people when you send your broadcast emails.
Step 1: Create the Segment
In the main dashboard of your ConvertKit account, you’ll see a list on the right hand side with “Segments” being the first selection. You can create a new segment by clicking the “+Create a Segment” link.
You’ll then have the option to choose how you’re selecting your group of people. So first name your segment something that makes sense for your purposes, perhaps “Customers Only” and then choose what filters to use using the drop down.
(for this example you may have created a tag that gets added to your subscriber whenever they’ve purchased one of your products or have several tags for different products so you can automatically choose product specific customers)
You can select those that are included in this filter by selecting “any” or exclude by selecting “none”.
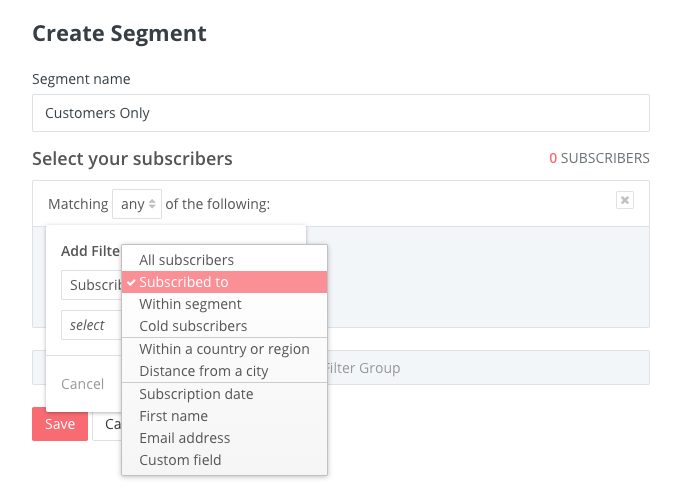
Then choose how you want to filter. The simplest choice will be “Subscribed to” then choose either a form or a tag.
You can then select as many variables as you need. And exclude the ones you don’t want to be included.
For example, I have a segment for people who are my “Main List” so that I only include those who are in the EU and have consented to GDPR plus those in other destinations.
To learn more about how I set this up, see this article:
How to Set Up ConvertKit for GDPR
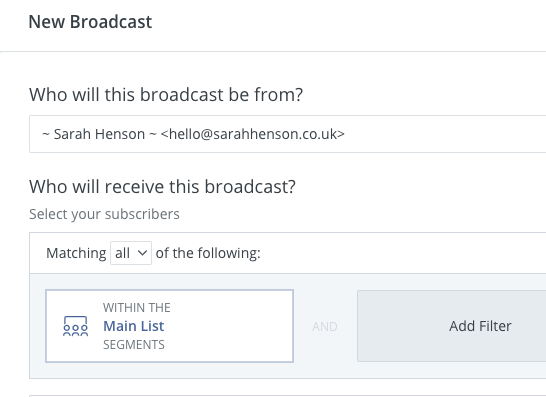
Step 2: Use the segment
When you come to send your Broadcast you can choose to send to a group of people based on their segment using the filet in the “who will receive this broadcast?” section.
Now that you know how to set up segments, you’ll need to go and choose how you want to define your segments and what makes sense for your business.
If you’re in the early phases of your business, it may be that you don’t need to segment, but having this on your radar as a strategy to implement in future is important to have in your arsenal.
If you have any questions on how to do this, please drop me a line through my contact form here.
Related content: