13 things (you didn’t know) you can do with Google Docs
Disclaimer: This post may contain affiliate links to products or services that I recommend. I may receive a commission should you sign up through my link (but at no additional cost to you). I only suggest products and services that I wholeheartedly support and believe in and have either used myself or have used on behalf of a private client.

I’m a huge fan of Google and run the majority of my apps through Gsuite because, well it rocks. The thing is, you’ve probably heard how great Google docs is, but to really understand why, you need to see the things it can do. In this post, I’m about to show you.
Using Google Workspace and Google Docs for your e-commerce business
For any business, staying organised is key. Plus, if you have a team you want all your members on the same page in terms of strategy, so having a central place for all your ideas and plans is key to effective business growth.
If you run an ecommerce store, your first instinct is to think of all the apps you need that are customer facing. Things like Shopify and Klaviyo or if you’re a Squarespace fan then Squarespace e-commerce and ConvertKit.
But to effectively run your business (I’m talking brainstorming ideas, writing copy, tracking data) you need a central location for all the backend stuff.
Google Workspace (formerly GSuite) is a brilliant platform for running your business – even if you only use it for the dedicated email service, you’re onto a winner with the minute monthly investment it costs. But what about all the other apps you have access to?
Things like Google Sheets, Google Forms and my most used app Google Docs?
I’m about to show you some fantabulous things you can do with Google Docs which will either push you over the edge and make you start using it or, if you already do use it, realise the potential at your fingertips that you’ve not yet been making the most of.
So let’s dig in!
Watch the video below or scroll to read.
13 things (you didn’t know) you can do with google docs
1. Page set up
[Video Time Stamp: 00’ 35”]
Google Docs automatically is set up for page size for the American Letter size. Whilst I find this fine for writing, if I’m printing (because I’m in the UK) I like to change my page size to A4. Also sometimes I like to change my margin sizes, especially if I’m trying to fit my writing into one page, so margin adjustments are vital for squeezing it all in!
To adjust your page setup go to: File > Page setup

2. Fonts and styling
[Video Time Stamp: 01’ 25”]
This is one of the best things you can do in Google Docs. If you have a set style you use for your business (fonts and sizing) then you’ll want to adjust your settings to reflect this. The reason why this is so good, is if you set text as a Heading 2, then decide you want to change how it looks… when you change the setting it will automatically update all the text that’s set for as Heading 2.
To change your settings, highlight the text you want to change and then click the “Normal Text” drop down and select the type of heading you want it to be, then “update Heading x” to match. This will then change the default for that heading in the document you’re using.

3. Permanently change your Google Doc settings
[Video Time Stamp: 03’ 45”]
The two options above are great if you’re changing your settings in one doc, but what do you do if you want to change these settings permanently so every new doc has these as a default?
All you need to do is create your template with all the settings as you want them, then go to: Format > Paragraph Styles > Options > Save as my default style

If you do this, please note that this will only apply to documents created from that point onwards. If you want to go back and change old documents that you’ve used any text headings in, you can select: Format > Paragraph Styles > Options > Use my default style
Also note this will only apply to your Docs. If you have a team that uses a separate login under your GSuite, then you’ll need to make sure they access the template and set their defaults the same.
4. Outlines
[Video Time Stamp: 04’ 25”]
If you want to be able to jump to various sections of your Google Doc, the doc automatically adds “outline” features as you type. To see the outline select: View > Show document outline
If you’re using the headline mark ups these will automatically display in the outline but you may also see text that you have made bold, underlined or even capitalised. If these don’t serve your purpose, then you can remove them by hovering over them and clicking the X to delete.
You can minimise the outline at any time by clicking the left arrow at the top of the outline list.

5. Find and replace
[Video Time Stamp: 05’ 35”]
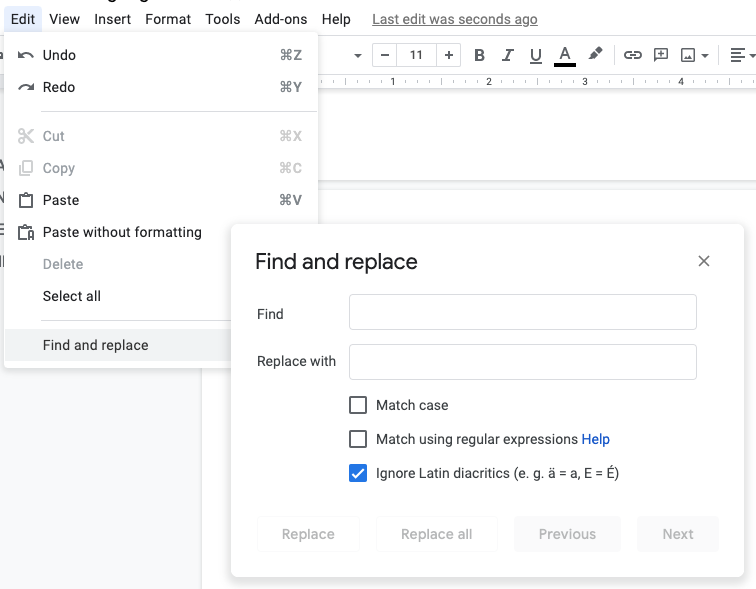
Now this is one of my favourite tools in Google Docs! If you have written a long document and realise that something you’ve named or referred to needs to change to a different name, you can use the Find and Replace feature to automatically change all examples of this particular text.
What I find it most useful for is the double space. Depending on what camp you’re in (and of course how old you are) you may not agree with me on this, but it’s considered standard you should only have one space after a full-stop (period).
Fun fact:
Back in the day when I started learning to type it was still considered form to use a double space. This was from the typewriter days where each letter was allotted the same amount of space so it was necessary to give a double space at the end of the sentence to make it obvious there was a pause (just so you know, I’m not THAT old - I never used a typewriter but it was just one of those “rules” that hung around for too long).
Nowadays computer typing adjusts the size of each letter spacing depending on the size of the letter. For example i and w are different sizes, on a typewriter they were given equal spacing whereas on a computer they are adjusted to fit properly.
So, if you’re like me and find it hard to rid yourself of the habit of double spacing after a full-stop, then you can use the Find and Replace feature to hunt down all those pesky double spaces and replace them with a single space.
To use this feature, select: Edit > Find and replace
6. Images
[Video Time Stamp: 06’ 40”]
Adding images to your Google Doc is as simple as “drag and drop” where you want it to be. You can alter the image to fit how you want. All you do is click the image and a little prompt box will appear to allow you to wrap the text around your image and adjust size, rotation and even colour adjustments including transparency.

7. Create a PDF with header banner
[Video Time Stamp: 08’ 00”]
Taking the images one step further you can drop them into your header to create a great first impression. This is useful if you like to create PDFs from your Google Docs (I do this with proposals and agreements).
To enter the header, double click at the top of your document. Then add a banner image to your area (I use a 1600 x 300 image). Then you can click the prompt box to wrap the text so that you can drag the image to the edges of the page to give a full width image.
To turn your doc into a PDF, click: File > Download > PDF Document

8. Voice typing
[Video Time Stamp: 09’ 30”]
I don’t use this feature, but it’s a great one to know about just in case you get an injury or RSI that prevents you from typing. It’s also a great tool if you find writing difficult but you can go with a stream of consciousness and say your thoughts.
You need to make sure your computer mic is on so you can talk out loud and the Google Doc transcribes your words into text.
Select: Tools > Voice Typing > then click the icon to activate the mic.

9. Creating anchor links
[Video Time Stamp: 10’ 05”]
If you’re creating a document with a contents table or index page, you can add in anchor links (or bookmarks) within your document and link your index to that area. So if you have chapters of a book, when you click “chapter x” the page will automatically jump to that chapter in the document.
First you need to add bookmarks where you want to link to and then when you link the text, you can select the bookmark you created as the link.


10. Commenting
[Video Time Stamp: 12’ 00”]
If you have a team or you get regular feedback from people on work you’ve done in Google Docs (like writing a new automation sequence) then you can use the comments to get feedback on your work. Or you can use it yourself to add prompts to your text or assign a task to a team member.
All you need to do is highlight text you want to comment on and click the little + icon that appears on the right hand side of your document.
To assign a task use the @ sign to add their name and check the box to assign it to them. This will notify them and also allow them to mark it as done.
11. Suggestion mode
[Video Time Stamp: 13’ 00”]
Another way to get feedback or even provide suggested edits to text so you can see the before and after version you can switch to Suggestion mode by using the drop down at the top right hand area of your doc.
This allows you to add edits, changes or suggestions without overwriting the original. You or other team members can then see these suggestions and either accept or decline the suggestions which will change or revert the text according to your choice.
12. Past versions
[Video Time Stamp: 14’ 05”]
My second most favourite feature of Google Docs is being able to go back on past versions of your document. This isn’t something you can use for every little edit you make in the doc, but if you consistently work on a doc over several days, you can see the main versions that have been saved in a timeline.
To see this feature, click on the link in the navigation bar of your document which will probably say “Last edit was seconds ago” (if you’re working in the document at that time) and it will reveal the timeline on the right. You can then toggle through the various versions and if you’d like to revert back to a previous version, then you can click “Restore Version”.

13. Sharing
[Video Time Stamp: 15’ 10”]
Finally this is one of the most useful features of Google Docs. If you want to share your Docs with other people either in your organisation or information to your customers (or clients) then you can get a link to your doc so that people can access it.
You can customise how they see the doc by giving them viewing, editing or admin permissions depending on what you want them to be able to do.
To access the share link, select: File > Share > select who you’d like to share with and what level of permissions you want them to have.


Using Google Docs to its full potential
There are many other features for using Google Docs, but these 13 are the ones that I think are the most useful when running an online business.
The more you use Google Docs (and the full Google Workspace) you’ll realise how useful it is, the fact that it all connects together and is stored in your Google Drive, makes it much easier to keep everything organised.
Related content:
How to organise your Google Drive